Browsing Category

Dessert

Dessert/ Pies/Tarts

Orange Tian

Uh oh, here comes another one of those challenges! and this one I’m definitely doing again.

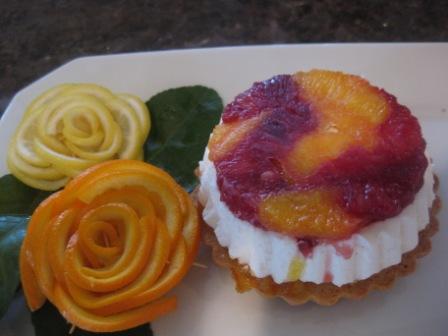
The 2010 March Daring Baker’s challenge was hosted by Jennifer of Chocolate Shavings. She chose Orange Tian as the challenge for this month, a dessert based on a recipe from Alain Ducasse’s Cooking School in Paris.

We have a neighbor who is always bringing us things to try. We get vension when he goes deer hunting, country ham when he goes back to Kentucky for a visit and this trip when they came back from South Texas we received a bowlful of oranges. Since this challenge involves oranges, I though I would put these fresh oranges to work and take them a big piece of this dessert.

I have to admit, I have never heard of an Orange Tian. If you have, then you are one step ahead of me. This challenge involved make a pate sable (crust), orange marmalade, segmenting oranges, making a caramel sauce, and doing a whipped cream where you mix in gelatin. I decided to do mine in these cute little tart pans that have been gathering dust in my pantry.

I am doing a technique class at Williams Sonoma tomorrow on pie crust. I’m not doing the pate sable crust but we are doing a pate brisee and pate sucre and a crust made with saltine crackers. I have never heard of the pate sable crust but after studying up on what I’m going to be making in class found out that the sable crust has a lot more sugar and the sucre crust. I makes it more like a cookie crust.

After making this dessert I knew I would be making it again. It was/is a beautiful dessert.  It can defnitely be made in stages. The crust could be made days in advance and frozen. The orange marmalade can be done in advance and putting it together is a breeze.

Continue Reading…

Cake/ Dessert

Whipped Cream Frosting

Time tested recipe from the 50’s!

This recipe is all about the frosting and not about the cake. This is best on chocolate or Red Velvet cake and you can make whatever recipe you want for the cake but please try this, it will become a favorite.

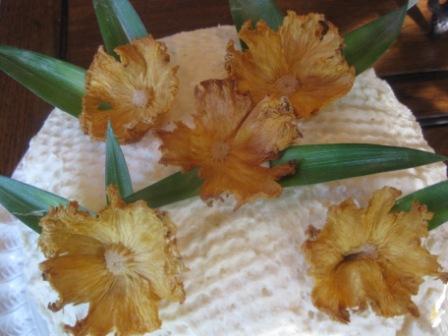
The dried pineapple flowers add a beautiful touch to this cake. Although I wouldn’t put pineapples on a chocolate cake (this cake) they would work really well on a Hummingbird cake or a pineapple cake. I will post the how to on the pineapple slices this coming week.

My mother was a wonderful baker and she made all sorts of things when we were growing up. She use to do this special cake around Thanksgiving called Amalgamation Cake. It had ground raisins, nuts, coconut, blackberry jam and almost a dozen eggs. What I remember most about this cake is she would make it a couple of weeks in advance, wrap it really well with plastic wrap and set it on the floor in the closet and over the next couple of weeks the flavors would all meld together into this wonderful tasting holiday cake. Over the years I have told myself I was going to enter that recipe in a contest because I have never seen a recipe with these ingredients.

Continue Reading…

Appetizers/ ColdApp/ Dessert/ Garnish

Dried Pineapple Flowers

I love Martha! and this recipe is from her Cupcake cookbook.

I think Martha is one of those names that you just have to say the first name and everyone just knows who you are talking about.

I taught a technique class on cakes and cupcakes the other day at Williams Sonoma. It was a fun class to teach and I love sharing recipes and ideas with everyone that comes to our classes. Even though I didn’t do any cake decorating, we made a Whipped Cream Frosting that my mother use to make way back in the 50’s. I like playing with food and making garnishes and platter decorations and everything but have never had the patience to learn to decorate cakes. So, these little pineapple flowers really did the trick to finish off a cake I had made for the class.

I plan on making these little flowers to put on top of Hummingbird cupcakes for a party I’m catering before a Jimmy Buffet concert. I think these will look so tropical and will fit well with the theme of the party.

Continue Reading…

Cake/ Dessert/ Morning Foods

Butter Scrumptious Coffee Cake

Believe me this is a very scrumptious coffee cake…with lots of memories.

In honor of my grandmother who will be 97 years old this May, I want to share with you her recipe for Butter Scrumptious Coffee Cake.

A little history on my grandmother. She was born in 1913 in Alabama.  She really had a hard life growing up. When she was young she had scarlet fever and lost all of her hair and when it came back in it was jet black. And that’s the way I remember her most of my life until she turned silver. Her mother died when she was young and she helped to raise most of her brothers and sisters. And, she did literally walk to school barefooted. She remembers picking cotton and pulling her little brother on the cotton sack. That was a hard life. Unlike when my sister and I were in high school we decided we were going to try and pick cotton to make some extra money and to see if we could actually pick cotton like our grandmother did. We went to the cotton patch with a friend. There we were in shorts, tank tops ready to put in a hard day’s work and everyone else had on big hats and long sleeve shirts. — WELL, our cotton picking days were short lived, we were fired by lunch time. We quickly found out there were no fun and games going on in the cotton patch.

I would say my grandmother had a very good life in the time she and my grandfather were married. Our family lived next door to our grandparents all of our lives and my twin sister and I spent every Saturday night with them. They took us to Florida every summer from the time we were three years old and I remember staying at the same beach house every year. It had a screened in porch with an old wooden ice box. As we got older we liked going to this little store that the owners of the house and motel owned to check out their two cute Cuban sons who worked there. We thought of any excuse to go to the corner drugstore to see them!

Our grandmother did everything for us. I guess you could say we were spoiled — BUT — far from rotten. She use to make this cake for us for breakfast and I still make this cake from time to and will always think of her when I make this recipe. It’s another great recipe for the freezer and it’s good anytime, not just for breakfast. My grandmother is still living in her own house and still cooks up her pot of chili when she knows we are coming for a visit.

I hope this will become one of your family favorites.

Continue Reading…

Candy/ Cookies/Bars/ Dessert

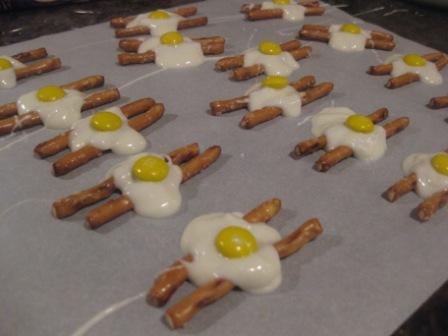
Bacon and Eggs

Bacon and Eggs – Sausage and Eggs, however you see it!

Ok, ok, so it isn’t really bacon and eggs. But, (my husband says I say BUTTTTT, way too much) it makes a cute breakfast/brunch amuse bouche.

Who doesn’t love bacon and eggs or sausage and eggs? Makes a great breakfast, lunch or dinner. If you are vegan then these little tidbits will satisfy you quickly. Meatless, egg less, but not sugarless!

I first saw this in a magazine at least 15 years ago. I cut the picture out, saved it for years, and have made it several times. This little “thing” (not really sure what to call it) makes a great little conversation piece for a brunch or breakfast.

I did a kids class one year at Williams Sonoma and showed the little ones how to make this along with my pear “rudolph”. They loved the bacon and egg snacks.

It’s simply pretzels, white chocolate and yellow M&M’s.

Continue Reading…

Dessert/ Morning Foods/ Pastries

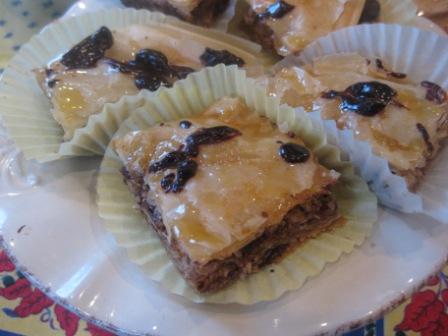
Chocolava

Bakalava, Chocolava, anything made with phyllo dough is fantastic!

I have been making bakalava since the early 70’s and I can’t believe I have never been intimidated by working with phyllo dough.  I love making anything with the stuff.  I have made little baskets to use as vessels for different appetizers. I have roll it up into roses to use for platter garnishes. It is great to make asparagus cigars (asparagus, wrapped with prosciutto and rolled in phyllo). Spanakopitas, of course, are wonder.  I have a delicious recipe for Chicken in Phyllo with a Lemon Veloute Sauce that is outstanding (will post this soon).

Baklava is a rich, sweet pastry made of layers of phyllo dough filled with chopped nuts and a sweetened honey/lemon syrup that is poured over the freshly baked baklava. This recipe has chocolate chips mixed in with the nuts and has melted chocolate drizzled over the top.

When we lived in Iowa back in the 70’s, I knew a girl who was Greek and she gave me a recipe for Baklava which I no longer have. But I remember her recipe had a mixture of walnuts, pecans and almonds and also used nutmeg and cloves with the cinnamon. My twin sister shared this chocolava  recipe with me years ago. Her recipe uses orange and lemon juice for the drizzle. I made a few changes to her recipe using the extra spices and nuts I mentioned above. Hope you will try this version and it will be come a favorite.

Delicious! If I do say so myself.

Layered sheets of phyllo, nuts, phyllo, it’s just that easy.

This comes together very quickly.

Finished Chocolava after it has been drizzled with honey mixture and chocolate.

Chocolava

Ingredients

  • 1 lb. phyllo dough
  • 1 lb. nuts mixture of walnuts, almonds, pecans finely chopped
  • 1- 6 oz. pkg. semi-sweet chocolate chips finely chopped (or use mini)
  • 3/4 c. sugar
  • 1 1/2 tsp. cinnamon
  • 1/4 tsp. nutmeg
  • pinch of ground cloves
  • 1 1/4 c. butter melted
  • 3/4 c. orange juice
  • 1/2 c. sugar
  • 1/2 c. honey
  • 1/2 c. water
  • 2 Tbsp. lemon juice
  • 2 squares 2 oz. semi sweet chocolate

Instructions

  1. Thaw the phyllo dough according to package directions. Combine the finely chopped nuts and chocolate chips, the 3/4 c. sugar and spices; set aside.
  2. Brush the bottom of a 1/2 sheet pan (15x11x1") with some of the melted butter. Layer 8 sheets of the phyllo dough in the bottom of the pan, brushing each sheet with a little of the butter. (If your pieces are too wide, just fold over that extra inch -- one time to one side and the next to the opposite side) Sprinkle about 2 cups of the nut mixture over the phyllo in pan. Top with another 4 sheets of the phyllo, brushing each with more of the melted margarine. Sprinkle with 2 more cups of the nut mixture and top with 4 more phyllo sheets, brushing each sheet with butter. Top with the remaining nut mixture and the remaining phyllo sheets. Drizzle remaining butter over top layer. Cut into diamond or triangle shape pieces, cutting to but not through the bottom layer. (About half way through will be good enough). Bake in 325° oven for 45 minutes to 1 hour. Watch carefully.
  3. Meanwhile, in a medium saucepan, combine the orange juice, the 1/2 cup sugar, 1/2 c. water, honey and lemon juice. Heat to boiling. Reduce heat and simmer 20 minutes.
  4. Immediately finish cutting diamonds or triangles. Pour over warm pan of phyllo. Cool completely.
  5. In a small saucepan combine the chocolate squares and 2 tablespoons water, stir over low heat until smooth. Drizzle this over the Chocolava. Makes about 50-60 small pieces.

Recipe Notes

**Note-- Until you get fast working with phyllo dough you may want to keep it covered with a damp cloth so it doesn't dry out.

Dessert/ Desserts

Tiramisu

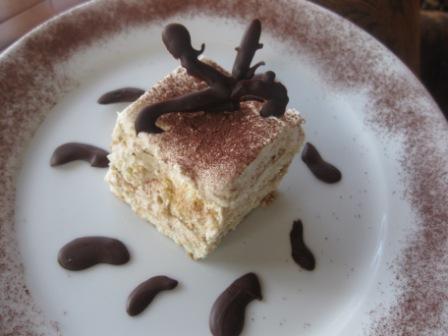
The perfect Tiramisu is a balance of flavors of a sweet zabaglione, strong coffee, marsala wine, creamy mascarpone cheese and the dusting of unsweetened cocoa.

The February 2010 Daring Bakers’ challenge was hosted by Aparna of My Diverse Kitchen and Deeba of Passionate About Baking. They chose Tiramisu as the challenge for the month. Their challenge recipe is based on recipes from The Washington Post, Cordon Bleu at Home and Baking Obsession.

For this challenge I debated about changing up the recipe and doing an orange tiramisu or maybe a lemon and raspberry or my son, Paul, suggested pumpkin ladyfingers with chocolate filling.  I kept going back and forth on ideas and decided to go with the traditional version. You just can’t beat anything with chocolate in it and I may do the pumpkin version sometime in the fall.

For this challenge we were suppose to make our own lady fingers, and the marscapone cheese. The marscapone cheese was so easy and looked beautiful. My first thought about this challenge was “hey, I can use my ladyfinger pan that I have used only a few times in 40 years”.  I have such a collection of pans, everything form 2″ bread pans, tiny bundts, tiny shortcake, madeline, heart shape, fish shape, egg shape, and even cactus shape.  You could say I’m a sucker for gadgets and baking pans. The ladyfingers turned out absolutely perfect. I could have used 2 additional pans as I ended up using cookie sheets covered with parchement for the remainder of the ladyfingers.

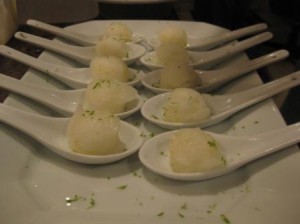
For those who want just a “bite” of dessert, serve in appetizer spoons.
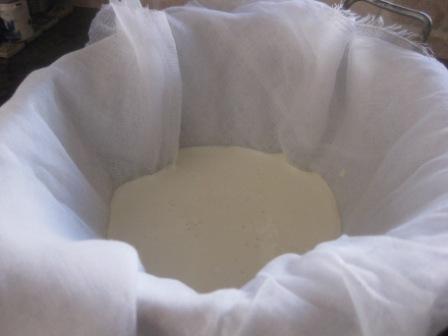
Heat the milk and lemon juice and then strain in cheesecloth.
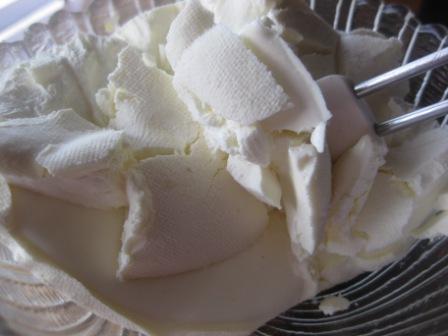
TIRAMISU

(Recipe source: Carminantonio's Tiramisu from The Washington Post, July 11 2007 ) This recipe makes 6 servings

Ingredients

  • Ingredients:
  • For the zabaglione:
  • 2 large egg yolks
  • 3 tablespoons sugar/50gms
  • 1/4 cup/60ml Marsala wine or port or coffee
  • 1/4 teaspoon/ 1.25ml vanilla extract
  • 1/2 teaspoon finely grated lemon zest
  • For the vanilla pastry cream:
  • 1/4 cup/55gms sugar
  • 1 tablespoon/8gms all purpose flour
  • 1/2 teaspoon finely grated lemon zest
  • 1/2 teaspoon/ 2.5ml vanilla extract
  • 1 large egg yolk
  • 3/4 cup/175ml whole milk
  • For the whipped cream:
  • 1 cup/235ml chilled heavy cream we used 25%
  • 1/4 cup/55gms sugar
  • 1/2 teaspoon/ 2.5ml vanilla extract
  • To assemble the tiramisu:
  • 2 cups/470ml brewed espresso warmed
  • 1 teaspoon/5ml rum extract optional
  • 1/2 cup/110gms sugar
  • 1/3 cup/75gms mascarpone cheese
  • 36 savoiardi/ ladyfinger biscuits you may use less
  • 2 tablespoons/30gms unsweetened cocoa powder

Instructions

  1. For the zabaglione:
  2. Heat water in a double boiler. If you don’t have a double boiler, place a pot with about an inch of water in it on the stove. Place a heat-proof bowl in the pot making sure the bottom does not touch the water.
  3. In a large mixing bowl (or stainless steel mixing bowl), mix together the egg yolks, sugar, the Marsala (or espresso/ coffee), vanilla extract and lemon zest. Whisk together until the yolks are fully blended and the mixture looks smooth.
  4. Transfer the mixture to the top of a double boiler or place your bowl over the pan/ pot with simmering water. Cook the egg mixture over low heat, stirring constantly, for about 8 minutes or until it resembles thick custard. It may bubble a bit as it reaches that consistency.
  5. Let cool to room temperature and transfer the zabaglione to a bowl. Cover and refrigerate at least 4 hours or overnight, until thoroughly chilled.
  6. For the pastry cream:
  7. Mix together the sugar, flour, lemon zest and vanilla extract in a medium heavy-bottomed saucepan. To this add the egg yolk and half the milk. Whisk until smooth. Now place the saucepan over low heat and cook, stirring constantly to prevent the mixture from curdling. Add the remaining milk a little at a time, still stirring constantly. After about 12 minutes the mixture will be thick, free of lumps and beginning to bubble. (If you have a few lumps, don’t worry. You can push the cream through a fine-mesh strainer.)
  8. Transfer the pastry cream to a bowl and cool to room temperature. Cover with plastic film and refrigerate at least 4 hours or overnight, until thoroughly chilled.
  9. For the whipped cream:
  10. Combine the cream, sugar and vanilla extract in a mixing bowl. Beat with an electric hand mixer or immersion blender until the mixture holds stiff peaks. Set aside.
  11. To assemble the tiramisu:
  12. Have ready a square serving dish (about 8″ by 8″ should do) or one of your choice.
  13. Mix together the warm espresso, rum extract and sugar in a shallow dish, whisking to mix well. Set aside to cool. In a large bowl, beat the mascarpone cheese with a spoon to break down the lumps and make it smooth. This will make it easier to foldin to the prepared cream mixture. Add the prepared and chilled zabaglione and pastry cream to the mascarpone, blending until just combined. Gently fold in the whipped cream. Set this cream mixture aside.
  14. Now to start assembling the tiramisu–Workings quickly, dip 12 of the ladyfingers in the sweetened espresso, about 1 second per side. They should be moist but not soggy. Immediately transfer each ladyfinger to the platter, placing them side by side in a single row. You may break a lady finger into two, if necessary, to ensure the base of your dish is completely covered. Spoon one-third of the cream mixture on top of the ladyfingers, then use a rubber spatula or spreading knife to cover the top evenly, all the way to the edges.
  15. Repeat to create 2 more layers, using 12 ladyfingers and the cream mixture for each layer. Clean any spilled cream mixture; cover carefully with plastic wrap and refrigerate the tiramisu overnight.
  16. To serve, carefully remove the plastic wrap and sprinkle the tiramisu with cocoa powder using a fine-mesh strainer or decorate as you please. Cut into individual portions and serve.
  17. For the pastry cream:
  18. Mix together the sugar, flour, lemon zest and vanilla extract in a medium heavy-bottomed saucepan. To this add the egg yolk and half the milk. Whisk until smooth. Now place the saucepan over low heat and cook, stirring constantly to prevent the mixture from curdling. Add the remaining milk a little at a time, still stirring constantly. After about 12 minutes the mixture will be thick, free of lumps and beginning to bubble. (If you have a few lumps, don’t worry. You can push the cream through a fine-mesh strainer.)
  19. Transfer the pastry cream to a bowl and cool to room temperature. Cover with plastic film and refrigerate at least 4 hours or overnight, until thoroughly chilled.
  20. For the whipped cream:
  21. Combine the cream, sugar and vanilla extract in a mixing bowl. Beat with an electric hand mixer or immersion blender until the mixture holds stiff peaks. Set aside.


MASCARPONE CHEESE

(Source: Vera’s Recipe for Homemade Mascarpone Cheese) This recipe makes 12oz/ 340gm of mascarpone cheese

Ingredients

  • Ingredients:
  • 474 ml approx. 500ml/ 2 cups whipping (36 %) pasteurized (not ultra-pasteurized), preferably organic cream (between 25% to 36% cream will do)
  • 1 tablespoon fresh lemon juice

Instructions

  1. Bring 1 inch of water to a boil in a wide skillet. Reduce the heat to medium-low so the water is barely simmering. Pour the cream into a medium heat-resistant bowl, then place the bowl into the skillet. Heat the cream, stirring often, to 190 F. If you do not have a thermometer, wait until small bubbles keep trying to push up to the surface.
  2. It will take about 15 minutes of delicate heating. Add the lemon juice and continue heating the mixture, stirring gently, until the cream curdles. Do not expect the same action as you see during ricotta cheese making. All that the whipping cream will do is become thicker, like a well-done crème anglaise. It will cover a back of your wooden spoon thickly. You will see just a few clear whey streaks when you stir. Remove the bowl from the water and let cool for about 20 minutes. Meanwhile, line a sieve with four layers of dampened cheesecloth and set it over a bowl. Transfer the mixture into the lined sieve. Do not squeeze the cheese in the cheesecloth or press on its surface (be patient, it will firm up after refrigeration time). Once cooled completely, cover with plastic wrap and refrigerate (in the sieve) overnight or up to 24 hours.
  3. Vera’s notes: The first time I made mascarpone I had all doubts if it’d been cooked enough, because of its custard-like texture. Have no fear, it will firm up beautifully in the fridge, and will yet remain lusciously creamy.
  4. Keep refrigerated and use within 3 to 4 days.
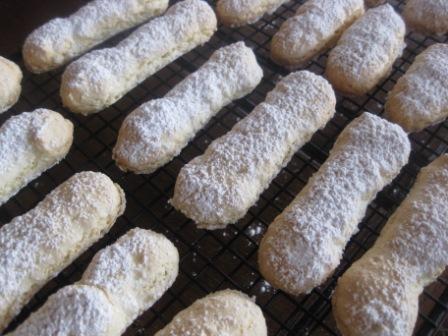
Beautiful and crisp ladyfingers just waiting for their dunk in espresso to become tiramisu.

LADYFINGERS/ SAVOIARDI BISCUITS

(Source: Recipe from Cordon Bleu At Home) This recipe makes approximately 24 big ladyfingers or 45 small (2 1/2" to 3" long) ladyfingers.

Ingredients

  • Ingredients:
  • 3 eggs separated
  • 6 tablespoons /75gms granulated sugar
  • 3/4 cup/95gms cake flour sifted (or 3/4 cup all purpose flour + 2 tbsp corn starch)
  • 6 tablespoons /50gms confectioner's sugar

Instructions

  1. Beat the egg whites using a hand held electric mixer until stiff peaks form. Gradually add granulate sugar and continue beating until the egg whites become stiff again, glossy and smooth. In a small bowl, beat the egg yolks lightly with a fork and fold them into the meringue, using a wooden spoon. Sift the flour over this mixture and fold gently until just mixed. It is important to fold very gently and not overdo the folding. Otherwise the batter would deflate and lose volume resulting in ladyfingers which are flat and not spongy.
  2. Fit a pastry bag with a plain tip (or just snip the end off; you could also use a Ziploc bag) and fill with the batter. Pipe the batter into 5" long and 3/4" wide strips leaving about 1" space in between the strips.
  3. Sprinkle half the confectioner's sugar over the ladyfingers and wait for 5 minutes. The sugar will pearl or look wet and glisten. Now sprinkle the remaining sugar. This helps to give the ladyfingers their characteristic crispness.
  4. Hold the parchment paper in place with your thumb and lift one side of the baking sheet and gently tap it on the work surface to remove excess sprinkled sugar. Bake the ladyfingers for 10 minutes, then rotate the sheets and bake for another 5 minutes or so until the puff up, turn lightly golden brown and are still soft. Allow them to cool slightly on the sheets for about 5 minutes and then remove the ladyfingers from the baking sheet with a metal spatula while still hot, and cool on a rack. Store them in an airtight container till required. They should keep for 2 to 3 weeks.

Recipe Notes

**NOTE-- I could have used 1 1/2 recipes for the ladyfingers and also the zabaglione and pastry cream. I had left over mascarpone cheese which I plan to use in a savory appetizer.

Bars/ Cookies/ Cookies/Bars

Nanaimo Bars

What’s a Nanaimo Bar – I’ve never heard of one.

The January 2010 Daring Bakers’ challenge was hosted by Lauren of Celiac Teen. Lauren chose Gluten-Free Graham Wafers and Nanaimo Bars as the challenge for the month. The sources she based her recipe on are 101 Cookbooks and www.nanaimo.ca.

Today I was sitting in a dentist chair waiting to have my teeth cleaned. Now, there isn’t a thing in the world I wouldn’t rather be doing at this moment. My least favorite thing to do in life is having my teeth cleaned. Don’t ask me why. I think, mostly, it is the polishing and that little grinder and that gritty stuff they put on your teeth. Years ago when my kids were in the dentist chair, I said to the dentist, “do you use the gritty stuff on them”, the dentist says, “oh, we don’t say gritty to the kids, we say CRUNCHY”.

Well, trying to take my mind off this “crunchy” treatment, I start thinking about the blog and what I could make. Crunchy keeps coming to mind and I know I’m making these Nanaimo (Nah-nye-Moh) bars for the challenge and I want to try and make homemade graham crackers for part of the recipe. So as I sit here, I imagine rolling out the dough, pricking holes in the individual cookies, baking and then pulverising them to make graham cracker crumbs. Ahh, that seems to do the trick because I can almost smell the cookies baking in the oven and before you know it, I’m out of this chair.

I have never heard of this dessert before. The recipe is a classic Canadian dessert recipe that originated in Nanaimo, British Columbia and since the winter olympics are going to be in Vancouver it seems a fitting dessert to try. After making it, I need to find someone to give them to to get them out of the house. This is a no-bake recipe so if you aren’t up to making the graham crackers from scratch, just buy some graham cracker crumbs from your grocery.

The graham crackers were actually fun to make. I think these homemade crackers would make great smores.

Nanaimo Bars

Ingredients

  • Bottom Layer:
  • 1/2 c.  unsalted Butter
  • 1/4 cup granulated Sugar
  • 5 tablespoons unsweetened Cocoa
  • 1 large egg beaten
  • 1 1/4 cups graham cracker crumbs
  • 1/2 cup  walnuts finely chopped
  • 1 cup  coconut
  • Middle Layer:
  • 1/2 cup unsalted butter
  • 2 tablespoons and 2 teaspoons heavy cream
  • 2 tablespoons instant vanilla pudding powder
  • 2 1/2 c. powdered sugar
  • 3 Tbsp. peanut butter
  • 3 Tbsp. Nutella
  • Top Layer:
  • 8  ounces semi-sweet chocolate
  • 4  Tbsp. unsalted butter

Instructions

  1. For bottom Layer: Melt unsalted butter, sugar and cocoa in top of a double boiler. Add egg and stir to cook and thicken. Remove from heat. Stir in crumbs, nuts and coconut. Press firmly into an ungreased 8 by 8 inch pan.
  2. For Middle Layer: Cream butter, cream, peanut butter, pudding powder, and icing sugar together well. Beat until light in color. Add the Nutella and swirl a bit with a knife. Do not over mix.  Spread over bottom layer.
  3. For Top Layer: Melt chocolate and unsalted butter over low heat. Cool. Once cool, pour over middle layer and sprinkle with additional chopped walnuts. Chill until firm.  If you have a hard time cutting these, try dipping a knife into very hot water and then cutting. The knife will slide right through the bars.

Cookies/ Cookies/Bars/ Dessert

Homemade Graham Crackers

I think graham crackers are the most misunderstood cookie ever eaten.

This is such a simple little cracker/cookie that never has gotten enough attention. Kind of like Cinderalla. Add some buttons and bows and dress her up and she becomes a beautiful young lady. Well, you can do so many things with this plain little graham cracker. Over the years I have made so many different desserts using graham cracker crumbs. Everything from pies, tortes, smores, pineapple puff balls, and was probably one of the first cookie/crackers I let my kids eat when they were toddlers.

These graham crackers were part  of a recipe for Nanaimo Dessert Bars and this recipe was adapted from Nancy Silverton’s La Brea Bakery book.

I first saw this recipe on Smitten Kitchen’s website and thought they would be fun to make and then when this Nanaimo Challenge came up from The Daring Kitchen, I decided it would be a good time to try the homemade graham crackers.

The graham cracker was developed back in 1829 by a Presbyterian minister Rev. Sylvester Graham as part of the Graham diet. Even though it is called a cracker it is more like a digestive biscuit (according to Wikipedia).

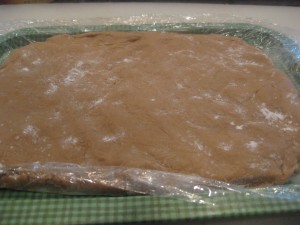
This is what the dough looks like when it is ready to go into the refrigerator to chill.

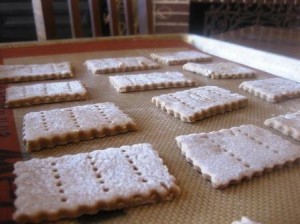
All rolled out. I used a fork to prick the tops.

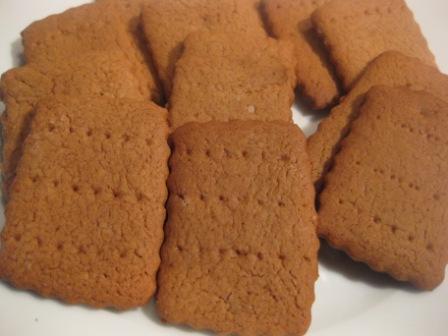
Finished cookie. Next time I will put the cinnamon topping on them even though a traditional cracker does not have cinnamon in it.

Graham Crackers

Ingredients

  • Graham Crackers
  • 2 1/2 c. plus 2 Tbsp. all purpose flour
  • 1 c. dark brown sugar lightly packed
  • 1 tsp. baking soda
  • 3/4 tsp. kosher salt
  • 7 Tbsp. butter cut into 1" cubes and frozen
  • 1/3 c. mild flavored honey
  • 5 Tbsp. milk full-fat is best
  • 2 Tbsp. pure vanilla extract
  • Topping optional
  • 3 Tbsp. granulated sugar
  • 1 tsp. ground cinnamon

Instructions

  1. Combine the flour, brown sugar, baking soda, and salt in the bowl of a food processor fitted with the steel blade or in the bowl of an electric mixer fitted with a paddle attachment. Pulse or mix on low to incorporate. Add the butter and pulse on and off or mix on low until the mixture is the consistency of a coarse meal.
  2. In a small bowl, whisk together the honey, milk and vanilla extract. Add to the flour mixture and pulse on and off a few times or mix on low until the dough barely comes together. It will be very soft and sticky. Lay out a large piece of plastic wrap and dust it lightly with flour, then turn the dough out onto it and pat it into a rectangle about 1" thick. Wrap it, then chill it until firm, about 2 hours or overnight. Meanwhile, prepare the topping, if using, by combining the sugar and cinnamon a small bowl and setting aside.
  3. Roll out the crackers:  Divide the dough in half and return one half to the refrigerator. Sift an even layer of flour onto the work surface and roll the dough into a long rectangle about 1/8" thick. The dough will be sticky, so flour as necessary. Trim the edges of the rectangle to 4" wide. Working with the shorter side of the rectangle parallel to the work surface, cut the strip ever 4 1/2" to make 4 crackers. I made mine about 1 1/2 - 2" and used a fluted cutter for the edges.
  4. Place the crackers on one or two baking sheets lined with parchment or Silpat. Sprinkle with the topping. Chill until firm, about 30 to 45 minutes in the refrigerator or 15 to 20 minutes in the freezer. Repeat with the second batch of dough. Gather scraps together into a ball, chill until firm and re-roll.
  5. Adjust the oven rack to the  upper and lower positions and preheat the oven to 350 degrees.
  6. To decorate the cracker: Mark a vertical line down the middle (I didn't do) of each cracker, being careful not to cut through the dough. Using a toothpick, skewer or fork, prick the dough to form two dotted rows about 1/2" for each side of the dividing line.
  7. Bake for 15 to 25 minutes, until browned and slightly firm to the touch, rotating the sheets halfway through to ensure even baking.

Dessert/ Ice Cream

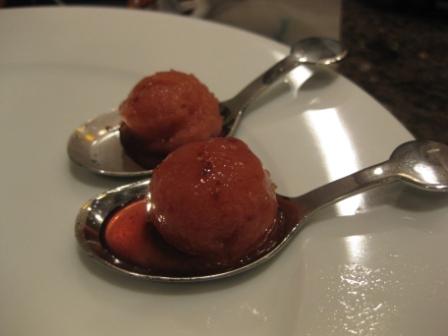
Lemon Basil and Port Fig Sorbets

There’s nothing like a good sorbet to cleanse the pallet between courses.

These two sorbets were part of our ten course New American Tasting Menu we did the day after Thanksgiving.

We have been trying to post some of the recipes we did that night and as usual, it has taken awhile to get things pulled together. I think everyone worked harder on this “feast” than any in past years. We had ten courses, ten wines, ten people (oh, that means we all consumed about one bottle of wine per person). That also means that we had 100 plates, 60 pieces of silverware, and 10+ glasses. We also had what was referred to as “intermission” wines.  If after eating our course and consuming our 2 oz. pour, you wanted more wine, we had some available.  I think we all partaked of “intermission” wines. 🙂

I have made this Lemon Basil sorbet before. It is one of Emeril’s recipes and back in the summer I traded the lemon for fresh watermelon and that also made a delicious sorbet. I had never had a port fig sorbet before but I had a bottle of port and some fresh figs so I thought, why not.  My daughter in law made the Port and Fig sorbet and I made the Lemon Basil sorbet to use as  palate cleansers between some of our courses.

Lemon Basil Sorbet getting a little lime zest.

Lemon Basil Sorbet

Ingredients

  • 2 1/2 c. water
  • 2 c. sugar
  • 2 Tbsp. lemon zest
  • 3 Tbsp. lemon juice
  • 24 basil leaves
  • 12 mint leaves

Instructions

  1. In a small saucepan, combine the water, sugar, lemon zest, and lemon juice. Bring to a simmer and cook until the sugar is dissolved, about 10 minutes. Add the basil and mint and set aside to steep for 3 minutes. Strain syrup through a fine mesh sieve and set aside to cool. Transfer to the refrigerator until thoroughly chilled, then process in an ice cream machine according to manufacturer's directions. Transfer to freezer-proof container with a lid and freeze until ready to serve.  See Watermelon Sorbet.

Fresh Fig & Port Sorbet

adapted from Ms. Adventures in Italy

Ingredients

  • 8 fresh figs
  • 1/4 cup water
  • 1 Meyer lemon zest and juice
  • 1/3 cup sugar
  • 4 tablespoons port
  • 1 1/2 cups water

Instructions

  1. Remove the stems and hard bits from the figs and cut into quarters. Add figs, 1/4 cup water, and Meyer lemon zest to a sauce pan. As the mix is heated, add the zest of the Meyer lemon juice. Cook covered for 10 minutes or until the figs have softened and begin to break apart. Stir two or three times during the 10 minutes.
  2. Stir in sugar and cook uncovered until the figs begin to thicken and become syrupy (about 2-3 minutes). Remove from heat.
  3. Using a food processor or stick blender, puree the fig mixture. Remember, it’s HOT so use extreme caution.
  4. To the puree, add the 1 1/2 cups water, port, and juice of the Meyer lemon. I opted to user Meyer lemon as it’s fragrant but not overly acidic. I didn’t want the sorbet to be too tangy.
  5. Once the mix is cool, pour into an ice-cream mixer and mix according to your mixer’s directions. I let it run for about 25 minutes and it was semi-firm. Pour into a container and freeze until ready to serve.

Appetizers/ ColdApp/ Dessert/ Desserts

Cannoli

When the moon hits the sky like a big pizza pie, it’s  cannoliiiiii (guess that should be amore’) 🙂

My first real cannoli was in Italy three years ago. We had gone on this 18 day trip to Italy with two other couples. After going to Venice for three days, then Cinque Terra for 3 days, and Rome three days, we settled in Tuscany at iL Borro villa (owned by the Faragamo family) for 8 days. It was a wonderful trip.

I think it was while we were in Cinque Terra and we were taking the train either to Santa Margarita or Monterosso that we learned a lot about riding trains in Italy. Once we were fined for not having our tickets validated. Ouch, that hurt, but could have been worst I guess if the guys argued with the ticket guys on the train.

Then one time we messed up on the timing of the train and had to wait an hour for the next train. While we were waiting, one of the guys hiked up to a little restaurant that he and his wife had been to before and came back with two huge cannolis that we divided up and devoured in seconds while waiting for our train. This was really late at night, maybe 11:30 or so and was getting kind of scary. We got better at reading the train schedules after that incident.

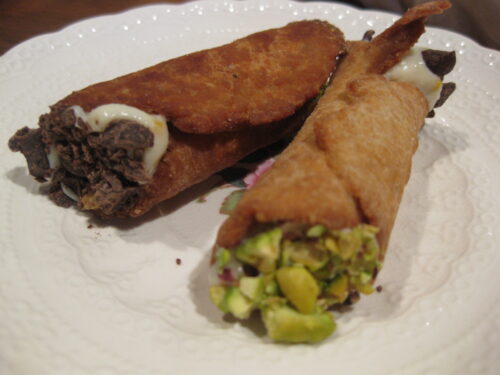
I have made savory cannolis before using a smoked salmon spread for the filling. Recently I made cannolis for a shower using a recipe that an Italian lady gave me 25 years ago. For this challenge I made some sweet ones using cocoa in the dough. I don’t think I care for that recipe as much as my original recipe.

Here are a few pictures of some of the ones I have made recently.

IMG_0021

These are great. I dipped one end in chopped pistachio nuts and the other in shaved semi sweet chocolate.

Continue Reading…

Cookies/ Cookies/Bars

Marvelous Macarons

This is my first attempt at making French Style Macarons — will I make them again?

call these M&M Macarons for two reasons. First they are decorated with these beautiful pink and purple M&M’s and the second is they are marvelousssss…

I have started participating in The Daring Kitchen baking challenges. I think this will be a lot of fun and will push me to try things I’ve never baked before. Once a month someone sponsors a challenge. Everyone is given the same recipe and you have a month to make it and post it to your blog. After catering for 20 years and being married for 40 years I can’t believe I have never made French Style Macarons so this is going to be an attempt to go out of my comfort zone. Whether it fails or succeeds, the results are posted here.

I was in NYC in September on our anniversary trip with some friends who were also celebrating their 25th anniversary. Our last night’s dinner was at Gramercy Tavern and one of the amuse bouche desserts (we had 4) we were served were tiny little raspberry French Macarons. They were fabulous. So, I guess after this challenge I will know if am a failure or not at making Macarons.

Three days before I’m suppose to be making these, I have my egg whites sitting at room temperature. From everything I have read on macaron tips aging of the whites is really suppose to make a difference in the finished product.

Here I’m sitting at the computer, knots in my stomach trying to get up enough nerve to start these cookies. Oh, how I want them to turn out the first time. I don’t deal very well with failures. I’m keeping my fingers crossed. (I ended up making four batches.)

I put it off a little longer, decided to go work out and get rid of some of the anxiety that is building in this challenge.  And, I thought I was fearless 🙂

RESULTS:

Continue Reading…