All Posts By:

Sherry

Cookies/Bars

Watermelon Cookie

Watermelon memories…

Another one of those memories from the past,  and this one is about watermelons. I told my husband as I was making the cookies and writing this blog that one of the many good thing about getting older is that I have all these memories I have associated with food stories.

Back when I was in high school, my husband, then boyfriend, and I went on a date to a watermelon festival in Hornersville, Missouri. I remember eating lots of watermelon, but what I remember most was hearing Sam the Sham and the Pharaohs at an outdoor concert singing “Wooly Bully”. That same weekend we went to a club called Batman a-go-go. We won our first dance contest there. Actually, it was the only dance contest we ever won.

I am making a watermelon sorbet tomorrow to go with these cookies. Can’t wait for you to try them together.

watermeloncookie 003

Doesn’t this dough look bright and watermellony. I used a red food paste that I had in my pantry. This isn’t the grocery store variety. You will never get very deep colors unless you have color paste. You know no matter how hard I try to not get the food coloring on my hands, I always end up with it smeared somewhere.

water1 001

Roll about 1/8-1/4″ thick and cut out with 3″ cookie cutter, then cut in half.

water1 002

Put these on ungreased cookie sheet or use a silpat like I did above.

water2 003

Cool on rack.

water2 004

Take the cooled cookies and dip the edge in the green frosting so you have a watermelon rind on the edge your cookie.

water2 005

Let these dry on rack. Don’t use the wax paper like I did because it keeps them from drying as well. Put the paper under the rack to catch drippings.

water3 001

Watermelon Cookies

Ingredients

  • 1/3 c. butter softened
  • 1/3 c. shortening
  • 3/4 c. sugar
  • 1 large egg
  • 1 tsp. vanilla
  • 1 Tbsp. milk
  • 2 c. flour
  • 1 1/2 tsp. baking powder
  • 1/2 tsp. salt
  • red paste food coloring
  • mini chocolate chips
  • 1 1/2 c. powdered sugar
  • 2 Tbsp. water or more for thinning
  • green paste food coloring

Instructions

  1. Beat butter and shortening in a mixing bowl. Gradually add sugar, beating well. Stir in egg, milk, and vanilla.
  2. Combine flour, baking powder and salt; gradually add to creamed mixture mixing well. Add a small amount of red food coloring to color dough as desired, beating until blended. Shape dough into a ball; cover and chill at least 3 hours.
  3. Divide dough in half; store one portion in refrigerator. Roll remaining portion to 1/4″ thickness on a lightly floured surface. Cut dough with a 3″ round cookie cutter; cut circle in half. Place on an ungreased cookie sheet or use Silpat on cookie sheet.
  4. Press several chocolate mini morsels in each cookie. Repeat with remaining dough. Bake at 375° for 8 to 10 minutes (do not brown). Cool on wire racks. Combine powdered sugar and water, mixing until smooth. Add a small amount of green food coloring, mixing until blended. Dip round edge of each cookie in green frosting, and place on wax paper until frosting is firm. Yield 3 dozen.

Recipe Notes

Beat butter and shortening in a mixing bowl. Gradually add sugar, beating well. Stir in egg, milk, and vanilla. Combine flour, baking powder and salt; gradually add to creamed mixture mixing well. Add a small amount of red food coloring to color dough as desired, beating until blended. Shape dough into a ball; cover and chill at least 3 hours. Divide dough in half; store one portion in refrigerator. Roll remaining portion to 1/4″ thickness on a lightly floured surface. Cut dough with a 3″ round cookie cutter; cut circle in half. Place on an ungreased cookie sheet or use Silpat on cookie sheet. Press several chocolate mini morsels in each cookie. Repeat with remaining dough. Bake at 375° for 8 to 10 minutes (do not brown). Cool on wire racks. Combine powdered sugar and water, mixing until smooth. Add a small amount of green food coloring, mixing until blended. Dip round edge of each cookie in green frosting, and place on wax paper until frosting is firm. Yield 3 dozen.

Candy/ Cookies/Bars/ Dessert

Migas Bark

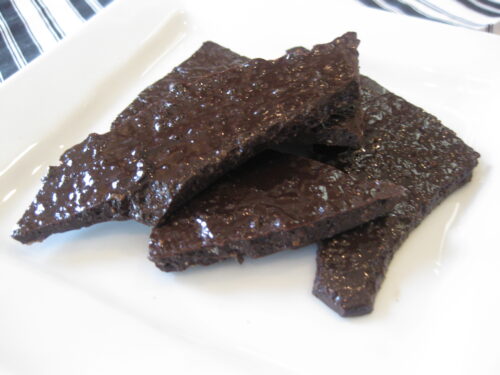
Bark made from breadcrumbs?

Last weekend we were in Chicago visiting our son and daughter-in-law who live in Bucktown. They have such wonderful restaurants, and so many are within walking distance of their home. One night we went to this new little restaurant Mado.  Their motto is Midwestern farmers, Mediterranean flavors. This restaurant is on one of the busiest streets in trendy Bucktown.

This restaurant is owned and operated by a husband and wife Allie and Rob Levitt, who met at culinary school.  They have worked in some of Chicago’s best restaurants. The restaurant processes and cure all their own meats and serve almost all of it, I think. We had a tripe dish while there and my son had a dish that had tenderloin, heart, and belly. The restaurant’s menu changes daily so you never know what delicious things may be showing up on the menu.

The New York Times did a review on the restaurant and said, “don’t miss the migas bark” and that is what the waiter told us that night. We ordered that along with a cornmeal cake which I will be making later this week.

This is my attempt to recreate the migas bark we had that night. 

This is a simple little bark but so good and crunchy you would not know you were eating chocolate and bread crumbs.

Tonight was our lady’s night out and we had sushi and came back to my house for pool floating time. That is always fun with a glass of wine and tonight my husband brought us out a chilled plate piled high with the chocolate migas bark. Yum!

bark1 001

Start with some very good chocolate. The better the chocolate, the better the bark will be. I used bittersweet because that was the remainder of my 10# block of chocolate I had in my pantry. Mado’s bark was a dark chocolate.

bark 003

I stopped by Panera Bread on my way home yesterday and picked up this little sourdough bread bowl. Cute isn’t it. Makes me want to make some soup to put in it, but today it is going for a dunk in the chocolate.

bark1 005

Make bread crumbs with it, then toasted them in the oven until nice and crispy.

bark1 006

Melt the chocolate in a double boiler or set bowl over pot of boiling water and stir until melted.

Fold in the crumbs and spread on cookie sheet lined with waxed paper.

bark2 003

Spread it very thin, the thinner the better.

IMG_1633

Migas Bark

Ingredients

  • 1 lb. very good dark chocolate
  • 1 – 1 1/2 bread crumbs torn into pieces

Instructions

  1. I didn’t measure anything but I would say I used about 1 lb. of chocolate and about 1/2 of that small loaf of bread. Melt the chocolate in a bowl over hot water until melted and smooth. Put the bread into a food processor and process until you have coarse crumbs. I toasted my crumbs in a 175 degree oven about an hour or until they were nice and brown.
  2. I processed the crumbs a little more if I still had some chunks. You do not want fine bread crumbs, just coarsely processed. Mix in the crumbs (use your judgement on how many to use). Pour this mixture out onto a cookie sheet lined with waxed paper. Chill in refrigerator until firm. Break up and put in container until ready to eat. Enjoy.
Soup

Cucumber Soup

 Cool as a cucumber

Living in Texas for 20 years, we are always looking for a way to stay cool. We stay cool in the pool, in the movie theaters, sitting in front of a misting fan, we wear thinner clothes, we splash water on our faces, we draw curtains, we run fans (even if we have air conditioning), we cook outside often to keep from heating our homes up, or we stay cool eating cool foods on a hot summer day.

Just returning from Chicago over the weekend and enjoying 70° temperatures, we were faced with our 102° reading on our car thermometer. Well, so much for sleeping under blankets and grabbing a jacket before going out for dinner at night. We are back to our “heat” of Texas and this Cool Cucumber Soup will keep you cool and wanting more.

Some day I’m going to make my cucumber sandwiches that I love so much and have it with this cucumber soup. I love cucumbers and I would be “as cool as a cucumber” I think if I had this for lunch one day.

I was going to serve this to friends in my little 2″ martini glasses but decided the soup was so delicious we deserved more. So, I used larger martini glasses and we used a spoon to eat it instead of sipping the soup.

cucumber 004

I didn’t use the large cucumbers that go into salads and the store was out of English cucumbers which I would have used. These weren’t pickling cucumbers either and I don’t think they were Derby cucumbers. There were 5 small cucumbers in a package. They were about 5 inches long. If you can’t find these, I would use about 3-4 cups chopped cucumbers. If the soup is too thick, you can always thin it with chicken broth.

bananasoup 001

This particular recipe called to saute the onion and garlic a little and stir in the cucumbers and saute a little more. I think this step kind of brightens the cucumbers up a little.

bananas1 003

I finished this off with a dot of the creme fraiche I had left over from making my Coconut Banana Puffs. If you draw a toothpick through the circle you will have a little heart of creme fraiche floating in your soup. I garnished this soup with salad burnett which is a herb that has a cucumber taste. And, I love the look of it on anything.

Cucumber Soup

Ingredients

  • 1 small onion chopped
  • 2 garlic cloves minced
  • 2 Tbsp. olive oil
  • 2 large cucumbers or 1 English cucumber or about 3-4 cups
  • 1 c. buttermilk or yogurt*
  • 1 c. chicken broth
  • 2 Tbsp. chopped fresh basil I used salad burnet

Instructions

  1. Heat the oil in saute pan and add the onion and garlic and saute for 7-8 minutes on medium-low heat (not browning) until the onion is transparent. Stir in the cucumbers and saute for about 3-4 minutes. Pour this mixture into a blender with the buttermilk (and/or yogurt) and the chicken broth. Blend until you have everything smooth.  Chill, stir in basil (or salad burnett) and salt and pepper to taste. You can adjust the consistency by adding a little more broth. Garnish with creme fraiche and serve in your favorite bowl or martini glass.

Recipe Notes

*Note -- I used 1/2 cup buttermilk and 1/2 cup Greek yogurt

Appetizers/ Dessert/ Morning Foods

Coconut Banana Puffs

Sherry Sherry bo berry

Banana fana fo ferry

Fe fi mo merry

Sherry…..

The Name Game…………….. Boy do I ever keep dating myself.This song was really popular when I was a teenager. When I first thought of making these little banana puffs I thought of this song. Don’t know why this keeps happening, but I will go to make something for the blog and something pops in my head that reminds me of what I am about to make.

I think I am having Thurberish moments. James Thurber once said on writing, “I don’t believe the writer should know too much where he’s going. If he does, he runs into old man blueprint”. Hey, maybe that’s me trying to not get old. My mind wanders all over the place sometimes. Today, it’s wandering in the direction of making these Coconut Banana Puffs.

These delicious little puffs of coconut are just waiting to be gobbled up. I have made these for many showers and parties that I have catered over the years.

You can buy your creme fraiche but you will pay $4-$5 for it verses the cost of whipping cream and one tablespoon of buttermilk and it is better homemade.

Mise en place and ready to go. (Everything in place). Bananas ready to take their dive into the creme fraiche and then a roll in the coconut. I’m not sure if it is the acidity of the cream but these will stay fresh and not turn dark for several days.

Look at that creme fraiche. It is so easy to make, why buy it? If you have never made creme fraiche, it may take 24 hours, but it is really easy. You mix the whipping cream and buttermilk, cover, let set 24 hours and when you come back to it you have this wonderful cream that you can use on top of soups, entrees, desserts or dip your bananas in it like I am doing here.

And ready for a dive into the coconut.

IMG_8897

Now, ready to be eaten.

Coconut Banana Puffs
I've made these for "decades" now and still live the tartness of the creme fraiche and the bananas and coconut. Such a light little dessert.
Write a review
Print
Creme Fraiche Ingredients
  1. 1- 8 oz. carton whipping cream
  2. 1 Tbsp. buttermilk
  3. 3-4 bananas, cut in 3/4-1″ pieces
  4. Sweetened coconut
Instructions
  1. Put the whipping cream and the buttermilk in a bowl, stir and cover loosely with either cheesecloth, napking or paper towel. Set this on the counter for 24 hours. When you come back to this, it will be nice and thick. Put in the refrigerador and chill, it can be stored for up to 2 weeks. After it has become nice and cold, you are ready to make the banana puffs.
  2. Have everthing in place — a bowl of coconut*, bowl of creme fraiche, and banana pieces. Take one banana at a time, dunk it in the creme fraiche and using a knife take off any extra that may drip off. Now pop this in the bowl of coconut and roll to cover and set in container to be refrigerated when you are finished. That’s it! Enjoy.
Notes
  1. *Tip — I put just a little coconut at a time in a bowl instead of the whole bag. If you do it this way, you won’t end up having big chumps of coconut that have gotten mushy from tossing the bananas.
Rosemary and the Goat https://rosemaryandthegoat.com/
Dessert/ Pies/Tarts

My First Summer Fruit Galette

First crush, first date, first kiss, first Summer Fruit galette!

Do you remember your first crush, your first date, your first kiss, your first born (& 2nd and 3rd)? I do, and I will remember my first Summer Fruit Galette.

These days I get a lot of my inspiration in cooking from my kids. They love to cook and try new recipes and since being “empty nesters” for the last several years, I have gotten into the habit of just throwing something together for dinner. Since starting this blog a month ago, I think I am getting some of my creative juices flowing again. So, today I have decided to try a Summer Fruit Galette.

gallette3 001

For some reason the word “Galette” brings to mind a little French woman with a scarf on her head standing in her kitchen after a long hard day of doing chores. She wants to make something special for dessert tonight for her family. She won’t be making a lattice top crust or one of those crust with the cute little shapes cut out. No, she will be making this rustic free form tart full of fruit she has just picked from her garden. This will be a quick, easy dessert for her to throw together for her family.

So, this is my attempt to be that little lady, I don’t have scarf on my head, but I do have the desire to make this nice tart for my husband and friends who are coming to dinner tomorrow night.  — Sherry

galette 002

Cherry jam is sometimes hard to find but delicious.

galettecrust 003

Roll pastry out very thin.

galettecrust 005

Have all your fruit ready to put on the pastry.

galettecrust 004

galettecrust 006

Just fold and pleat the crust up, bringing it over the filling.

gallette3 003

This was delicious the next day reheated. With or without whip cream – I served with sugar free ice cream. Had to cut calories someway.

My First Summer Fruit Galette

Ingredients

Crust:

  • 2 c. all purpose flour
  • 2 Tbsp. sugar
  • 12 Tbsp. cold butter cut in 3/4″ chunks
  • 1/2 tsp. salt
  • 1 tsp. vanilla extract
  • 7 Tbsp. ice water

Topping:

  • 1 carton blackberries
  • 1 carton raspberries
  • 4 nectarines and peaches combination
  • 2-4 Tbsp. sugar
  • 2 Tbsp. flour
  • 1/3-1/2 c. cherry jam or your choice

Egg Wash:

  • 1 egg
  • 1 Tbsp. water
  • sugar for dusting crust.

Instructions

  1. Crust: Put the flour, salt, sugar into the bowl of a food processor. Pulse a few times. Add in 1 tsp. vanilla and while you pulse as you go, add the chunks of butter one at a time. Pulse until you have small pea size pieces. Start adding the 7 tablespoons of water as you pulse. When this starts to come together, turn out onto pastry cloth or cutting board and form into a disk. Wrap in plastic wrap and refrigerate for 15 minutes. Flour your board or cloth a little (don’t use too much flour) and also a little on your rolling pin. Roll the pastry to a 14″ circle. Move this onto your large cookie sheet. It can overlap the edges a little because you are going to be folding in the edge over the fruit. Topping: Peel, pit and slice the peaches and nectarines. Put the peaches, nectarines, blackberries, and raspberries in a bowl. Toss these with the sugar and flour until coated. Spread the cherry jam on the center of the crust, leaving about 1 1/2-2″ not covered with the jam around the outside edges. Arrange your fruit in the center coming to withing the same 1 1/2-2″ of outside edge. Now start folding in the crust over he fruit, pleating when necessary, all the way around the tart. Beat the egg with the water. Brush this mixture over the turned up crust edge and sprinkle with sugar. Bake in 350° for 30-40 minutes or until nicely browned.

Entree/ Pizza

Shrimp and White Bean Pizza with Herbs

 
“When the moon hits your eyes like a big pizza pie, that’s amore” and Dino sings on and on….

When I first got married 40 years ago, pizza to me was a 50 cent box of Chef Boradee pizza mix and a 50 cent pound of hamburger meat. We, of course, didn’t have a pizza place in the town we grew in, so if you wanted pizza, you made it. The little town we lived in when we were first married had a great local place called Alex’s Pizza and to this day, I still can remember the thin crispy crust. We still made our pizzas most of the time because my husband was still in college and we didn’t eat out alot.

We went to Italy a few years ago and had some of the best Italian food I have ever eaten. Also, had some of the best pizza I have ever put in my mouth.

I have to tell you the story about when we were in Venice. This was our first trip to Italy and I wanted to have everything perfect. So I loaded my iPod with all kinds of music that I thought would just make the trip special. I had packed some external speakers so everyone else could enjoy the music also. We were with two other couples (one couple we would meet up with in another town a few days later). One night in Venice after going out for just one of our memorable meals, we went back to our hotel which was kind of in an alley way with a big brick courtyard. It was late at night and we set the speakers up on a fountain that was there and we were listening to the music and dancing. This was about the same time some of the local guys were getting off work for the night and they could hear the music coming from our area and decided to come see what was happening. We had one guy who had been selling roses during the day give us a rose each and a few guys interested in the ipod. But, the one thing they all knew was — “that’s Dino they said. And, he WAS singing, “When the moon hits your eyes”. I always love to tell this story.

Anyway, when we returned from our trip we tried (I think successfully) to replicate a lot of our dishes like the tomato bread soup, linguine with seafood (will be posting later). I haven’t tried any pizza recipes for quite awhile but I wanted to do something not quite so traditional. This recipe I found in a little pizza book I picked up called “Pizza and Other Savory Pies” by Brigit Binns.

Pizza 003

I tweaked this recipe somewhat. To the pizza dough, I added about 1 teaspoon Italian seasoning. To the mashed white beans I added 1/2 teaspoon of crushed red pepper and about 1 teaspoon of lemon juice.

Potatopizza 004

pizza1 001

To the finished pizza, after sprinkling with the fresh herbs, I drizzled a small amount of olive oil over the pizzas and also squeeze fresh lemon juice all over. 

pizza1 006

Pizza with Shrimp, White Bean Puree and Herbs

Ingredients

  • 1 ball pizza dough
  • 2 1/2 tbsp. olive oil plus extra
  • 1 can small white beans rinsed and drained
  • 2 cloves garlic minced
  • 1/2 tsp. crushed red pepper flakes
  • juice of 1/2 lemon
  • salt and freshly ground pepper
  • 1/2-3/4 lb. small shrimp peeled, deveined and halved lengthwise
  • 1/2 tsp. dried oregano

Garlic Bread Crumbs:

  • 4 Tbsp. bread crumbs
  • 1 Tbsp. Olive
  • 2 Tbsp. Parmesan Cheese
  • 1 tsp. garlic finely chopped
  • 2 Tbsp. chopped basil and parsley
  • 2 tsp. finely chopped fresh oregano

Thin Crust Pizza Dough

  • 3 1/3 c. all purpose flour extra for dusting
  • 1/4 c. whole-wheat flour I used all plain flour
  • 1 pkg. 2 12/ tsp. quick rise yeast
  • 1 Tbsp. sugar
  • 1 Tbsp. salt
  • 1 tsp. Italian seasoning
  • 1 1/4 c. warm water
  • 2 Tbsp. olive oil plus extra if needed

Instructions

  1. Place a pizza stone on a rack in the lawer third of the oven and preheat to 450°. Let the pizza stone heat for 45-60 minutes. I cooked my pizza on a perforated pizza pan and another one just on a cookie sheet.
  2. Roll out the dough on parchment paper or flour dusted cutting board. (I made my pizza into individual ovals instead of doing one large pizza.) Press the dough out into the shape you desire using oil to coat your fingers. If dough starts to draw up, cover with towel and let rest or a few minutes, then continue. The thinner the crust, the more crisp it will be. Cover dough with towel and let rise for 15 minutes.
  3. In food processor, combine the white beans, garlic, salt, pepper, crushed red pepper flakes, lemon juice and olive oil. Process until smooth and set aside.
  4. In a bowl, combine the shrimp, dried oregano, salt and pepper to taste and 2 Tbsp. olive oil.
  5. Brush the edges of the dough lightly with the olive oil. Season the dough with salt and pepper. spread the white bean puree evenly over the dough, leaving 1/2″ border uncovered. Scatter the shrimp and garlicky bread crumbs over the puree. Carefully slide the pizza topped parchment or cutting board onto the hot pizza stone (or put it on the cookie sheet). Bake until the crust is golden brown and the shrimp are pink, about 14 minutes.
  6. Remove pizza from oven and garnish with the fresh herbs, drizzle with a little olive oil and squeeze the remaining one-half lemon over the pizza.
  7. For crust: In food processor or mixing bowl with dough hook, combine the flour, whole wheat flour, yeast, sugar, salt and Italian seasoning. Pulse or mix the ingredients. With the motor running, add the water and olive oilin a steady stream and then pulse or mix until the dough comes together in a rough mass, about 12 seconds.

  8. If the dough does not form ino a ball, sprinkle 1-2 teaspoons of water and pulse/mix again until a rough mass forms. Let the dough rest for 5-10 minutes. Process again for 25-30 seconds. The dough should be tacy to the touch but not sticky. Transfer the dough to lightly floured work surface and form it in a smooth ball. Place the dough in large oiled bowl, turn to coat with oil and cover with plastic wrap.
  9. Let the dough rise in a warm place until doubled in bulk and spongy, about 1 1/2 hours. Makes 2 balls of dough. You can freeze what you don’t need for this recipe.
Appetizers/ ColdApp/ Sandwiches

Pink Heart Egg Finger Sandwich

I “heart” you finger sandwiches. Pretty and pink.

I have done these little sandwiches for bridal showers, baby showers and just because the are so cute. If you have an upcoming shower of any type, these are the perfect little sandwiches.

I love beets – period. On the other hand my husband says he doesn’t like “red” things on his plate and won’t try them.  He does eat ketchup, tomatoes, and other red things.  I think this is his way of saying “I don’t like beets”. I love the little heart cutouts for this sandwich and people are always thinking I hand carve them.

You’ll notice that only the outside is pink. The pinkness depends on how long you let them soak in the beet juice. These only soaked for about 3 hours. If you soak them overnight they will dye pink all the way to the yolk. Sometimes it may start to dye the yolk too so I usually remove after 5-6 hours. You can experiment with 4-5 hours first and if that isn’t pink enough soak longer on the next try.

heart1

You can make your own pickled beets (less expensive) or you can buy them already pickled. You will need a lot of juice if you are dying a dozen or more eggs. I would probably do at least 2 times the recipe below. My hearts were cut with a tiny aspic cutter made by Ateco (aspic or jelly cutters) 3/4″.

Egg Sandwich with Beet Garnish

Ingredients

  • 1 can sliced beets
  • 1 cup beet juice
  • 1 cup vinegar
  • 4 Tbsp. sugar
  • 4 cloves
  • 1 tsp. salt
  • 12 hard boiled eggs peeled
  • White bread cut in 2″ circles

Topping for Bread:

  • Mayonnaise
  • Fresh basil chopped fine

Instructions

  1. Bring all ingredients to a boil (except the eggs and the beets). Let cool then add eggs and soak a minimum of 4 hours. If you want the whites to turn pink all the way through, let them stand about 7-8 hours. Save your beets for another recipe or you can add back to the juice after you are finished dying the eggs.
  2. Mix mayonnaise with fresh cut basil and top the bread circles with this mixture. Just before serving, slice the eggs carefully so you don’t lose any of the yolk. Top the bread slice with a slice of egg and then using a very small heart cutter, cut a slice of beet to go on top. You don’t want to put the beet heart on too soon or it will start to dye the yolk.


Cake/ Dessert

Blackberry and Raspberry Upside Down Cake

What to do with those summer fresh blackberries and raspberries — make cake!

I remember back when my grandmother would make a Pineapple Upside Down Cake. She would use an old cast iron skillet. I believe this is the best way to make a pineapple upside down cake. The pan is nice and heavy and I think it helps to caramelize the brown sugar and the pineapple. I always wanted to be the one (I have a twin sister) who put the cherries in the center of the pineapple rings. I’m sure we took turns.

So, this is a different upside down cake and I didn’t use a case iron with this recipe. Instead I used a 9″ non-stick cake pan. Over the 4th when I was grocery shopping, (my favorite chore) I saw all these beautiful blackberries and raspberries and decided I needed to try this recipe I have had for seven years. A little flour, sugar, butter and berries and this wonderful cake appeared out of my oven, begging me to try a piece. I did and now I need to give it to a neighbor so I’m not finishing it off.

Isn’t it beautiful. A little powdered sugar or whipping cream and a grate or two of lemon zest and you have a great brunch dessert. This recipe called to double the parchment (I used waxed paper). I didn’t double it and now know I will the next time. The waxed paper got pretty limp and I think it definitely needs to have two layers. I usually cut a piece of waxed paper and put the pan on top and using scissors, draw around the bottom of the pan. Then cut out the circle and you will need for your pan.

Continue Reading…

Dessert/ Pastries

Nutella Cherry Dumplings

Life is like a bowl of cherries. 

That was the title of a song sung by Ethel Merman in the movie Scandals in 1931. That is way, way before my time (a few years anyway). You have heard the expression give me lemons and I’ll make lemonade. Well, you give me Nutella and fresh cherries and I’m going to make these little Dumplings.

che 002

This is the perfect time of the year to buy fresh cherries. And if you don’t have a cherry pitter, you really need one. It makes pitting so much quicker. I love pitting cherries. Can’t tell you why I get pleasure out of that but, as the song says “live and laugh at it all”.

Cherries are one of my favorite fruits. I love cherry pie, cherry cobbler, cherry Kool Aid and even Luden’s Cherry Cough Drops. I use to love cherry Tootsie Roll Pops when I was a kid.  Couldn’t wait to get to that chocolatety center.  (Hum, maybe that is why I like these little dumplings so much.) 

cherries 005cherries 003

cherryies2 005

These are so simple to make and only take a few minutes of frying and a dust of powdered sugar.  I tried making one just by folding it over in a half circle but it wasn’t as pretty. I’m going to freezing these before they are fried to see how they do once they are thawed and fried. — Sherry

cherryies2 006

Nutella Cherry Dumplings

Ingredients

  • 1 jar of Nutella
  • Fresh Cherries pitted
  • Gyoza Wrappers or wonton wrappers
  • Powdered Sugar for dusting
  • Oil for deep frying

Instructions

  1. Take the Gyoza wrapper or won ton wrapper and lay several out on your cutting board. Put about 1- 1 1/2 tsp. of the Nutella in the center and add about 1 1/2 chopped cherries to the center of the Nutella. If you are using the Gyoza wrapper they are round. Moisten the outer edge with a little water. Pull two sides up to meet and seal, now pull the other two sides up and press to make the little rectangular pouches. After you have several made, heat your oil to 350°. Fry the dumplings until golden brown and then drain on cooling rack. Sprinkle with powdered sugar and serve. These would be great with a bowl of cherry or chocolate ice cream.
Appetizers/ Food Stories

It’s not always just about the food….(Missouri Trip)

It’s about getting together, having fun, food, and enjoying each other’s company.

A few weeks ago we took a road trip back to our hometown in Missouri. My husband and I both were raised there, met in high school, and we will be celebrating our 40th anniversary this summer. This trip was so my grandmother could meet her new great-great grandson and my husband’s mother could meet three of her new great grandchildren. One is our grandson from Texas, another baby is from California and one who lives locally. My mother-in-law  wanted to be able to see them all together and everyone had a great time passing the babies around.

This was truly a celebration. My mother-in-law has 8 great grandchildren and 7 grandchildren. My grandmother has 3 grandchildren, 5 great grandchildren and 3 great-great grandchildren. So there were plenty of hugs and kisses going around.

My sister-in-law put up some tents in her backyard and had games for the kids to play. We did fajitas that night. One of my sons cooked and I helped with the stuffed grilled jalapenos, the guacamole, Mexican rice and the beans. So this may look like an ordinary styrofoam plate of Mexican fajitas but it was much much more. Everyone really enjoyed the food that night, being together, and meeting all the new babies.

This is no ordinary plate of Mexican food!

IMG_0776

The next night we cooked at my twin sister’s house where we did bar-b-q ribs (while watching out for the tornadoes) and another night we got to feast on her homemade tamales and shrimp enchiladas. We have been sharing recipes for years and can never agree though on whose recipes are the best, but we have a good time trying different recipes. One night we tried this recipe for Grilled Provoleta.

IMG_0712

Grilled Provoleta

I do this a little different than most recipes. My recipe goes like this. Have some provolone cheese cut at 1″-1 1/4″ thick. Let the cheese stand at room temperature about an hour before cooking so it will dry out a little and develop a crust. This will keep it from melting so fast. I like doing the cheese over a charcoal or wood fire rather than a gas fire because the flavor is better. Before cooking coat the cheese with olive oil and press in dried and/or fresh oregano.

Now this is the tricky part,  I have a small 8″ round cast iron skillet hot on the grill. Spray the pan with cooking spray and also spray the grill. Put the round(s) of cheese on the grill for less than a minute.  You don’t want to lose all your cheese melting through the grill. Just as soon as it has grill marks, I flip it over into the iron skillet and continue until it starts to melt and gets kind of crusty. Now you can serve this with a crusty bread but I like grilled naan the best.  Hope you will try this. —  Sherry

Appetizers/ HotApp

Parmesan Bacon Wraps

A favorite at parties I have catered

These tiny little pieces of bacon, Parmesan and cracker are to die for. I have been making these for friends, family and catering clients for twenty years now. They are so easy to make. They may take a while in the oven, so that’s why if you want to make plenty and keep them in the freezer for last minute appetizers.

These are good with a glass of wine or even a glass of orange juice for breakfast.

bacon 003

Here’s what you are going to need. Bacon, Parmesan Cheese and Club Crackers. Depending on how many you want I usually calculate things this way. There are 11-12 pieces of bacon in a pound and you cut that into giving you somewhere between 22-24 bacon wraps per pound of bacon.

bacon 006bacon1 004bacon 001

Start by putting a small amount of Parmesan cheese on top of the cracker. Take 1/2 piece of bacon and wrap it around the cracker enclosing the Parmesan cheese. Line these up on a broiler rack (this will catch the grease that cooks out of the bacon.

bacon2 005

I usually bake these at 250° in my two convection ovens. I use all three racks. If you don’t have a convection oven, still use all three racks and bake at 250° for 1 1/2 -2 hours or until crisp and brown.   If you only have one broiler rack you can also put a cookie cooling rack inside a sheet pan (with edge).  Make sure you use the sheet pan because you don’t want grease spilling over in your oven.

If you are serving these immediately, drain on paper towels and then heap up on serving dish. If you will be eating these later, cool on racks, then put in ziplock bags and freeze.  When ready to serve, thaw and heat in 350° for about 10-12 minutes.  Drain on paper towels before serving.

These will be a hit.

Parmesan Bacon Wraps

Ingredients

  • 1 box of club crackers*
  • 1-2 lbs. bacon cut in half
  • 1 c. finely grated parmesan cheese

Instructions

  1. Cut the bacon in half and sprinkle about 1 teaspoon of parmesan cheese on top of the cracker. Carefully wrap one half piece of bacon around the cracker and cheese and put cheese side up on a broiler tray or a cookie sheet with cooling rack on top. Repeat until you have made as many as you want.
  2. Put the tray in a 250° oven and bake for at least an hour until they are brown and crisp. At this point I normally cool and freeze in bags until ready to serve. When ready to serve, put the bacon wraps on a rimmed cookie sheet and warm in 350 oven for about 5-8 minutes or until hot. I sometimes drain on paper towel if there is still a lot of grease.
  3. Note: I have mades these for over 30 years and the last several years I started noticing that about every other cracker would break when I was trying to wrap the bacon. I wrote Kebler and they told me it was because the crackers are now 0 trans fat. So, if you can buy generic that still has the trans fat, they work a lot better. If not, then be very gentle wrapping them.
Dessert/ Desserts

Mandarin Orange Napoleons

What about those wrinkled little oranges? I don’t think they get enough respect. You can buy them for around 50 cents a can. Not as expensive or tropical sounding as tamarind, guava, star, passion, or dragon fruit, but they are oh so good. Those tiny little segments of citrus that burst in your mouth can be used in salads, wonderful in main dishes and in all kinds of desserts. It is hard to stop eating them once you take the lid off the can. I’m guilty  of eating a whole can by myself.

What is a Mandarin orange? It comes from a small citrus tree resembling the orange tree and is just one variety of the orange family.  The fruit is oblate in shape, not round like the orange. I have never bought or even seen a fresh Mandarin orange. Although tangerines are similar, they are not Mandarin oranges. They are a variety of the Mandarin orange tree.  Mandarin oranges are easily peeled with the fingers.

Not to sound like Forrest Gump, but I have made Mandarin Orange Chicken Bites, Mandarin Orange Cake, Mandarin Orange Napoleons, Mandarin Orange Chicken and Rice Salad. I have put them in Tropical Mandarin Pork Kabobs, a 24 hour fruit salad, a Cashew Chicken salad with Mandarin Oranges and even topped a tea sandwich with a Mandarin Orange. It is a pretty versatile little fruit.

Continue Reading…